There is no right or wrong way to apply makeup. Makeup is self expression!” says Lindsay Kastuk, a commercial and editorial makeup artist based in New York City. No thumb rule can decide what will enhance your favorite features and create your desired look. However, perfecting the basics is the key to skillful makeup application. Applying makeup products the right way can make all the difference.
Whether you are trying makeup for the first time or have attempted it before, our step-by-step guide can help you achieve a flawless look. From winged liner techniques to cut-crease halo eye hacks, this tutorial will guide you about how to apply makeup step by step like a pro. Keep reading for simple makeup tricks!
How To Apply Makeup Like A Pro
It is imperative to start with a clean palette before applying makeup. Wash your face with a gentle cleanser and remove any old makeup to prevent your face from appearing cakey and unnatural. Cleansing your face before makeup application prevents clogged pores and skin irritation. You can use a makeup remover or baby oil to get rid of makeup residue.
Step 1: Start With A Moisturizer
Start With A Moisturizer Save
Make sure to complete your skin care routine before reaching for any makeup tools. Prep your skin with a moisturizer or serum to create a good base. This will keep your skin hydrated and firm and help lay your makeup properly. If your skin is not moisturized enough, the foundation will look cakey and heavy and is deposited on the dry areas of your face.
Step 2: Apply Primer
Apply PrimerSave
Lindsay mentions, “Primer is applied after your moisturizer and SPF but before your foundation. Generally speaking, you want to apply your primer all over your entire face. Some primers are made for specific areas (redness, enlarged pores, oiliness), so you would want to apply it only to the areas that the primer is meant to work for.”
Primer acts as a barrier between your skin care and makeup and prevents the makeup from sinking into your pores. It helps your makeup appear smooth and long-lasting and gives an airbrushed finish. Use a primer to fill fine lines and large pores and create an even canvas for your makeup to glide smoothly and not look cakey.
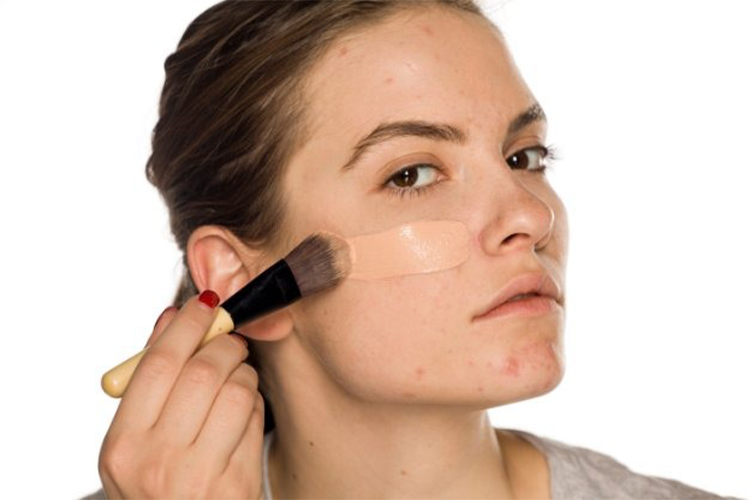
Step 3: Set The Base With Liquid Foundation
Set The Base With Liquid FoundationSave
Choose a foundation depending on your skin type and tone. If you have oily skin, go for a matte finish and shine control foundation. For dry skin, choose a dewy, hydrating foundation. You need to play around with these products and figure out what is best for you.
Color-match your foundation based on pink or yellow undertones. You probably have a pink or cool undertone if you have fair skin, whereas a yellow or warm undertone is found on people with Asian or olive skin. Also, decide the coverage of your foundation (full, medium, and light) based on your skin condition and the extent of imperfections you want to hide.
Lindsay Kastuk says, “This [foundation] can be applied in many ways! You can use many different types of brushes (fluffy, kabuki, flat brush), but you always want to make sure the brush is a synthetic fiber when using liquid foundation. You generally want to start the application where you feel you want the most coverage! The most common way to apply is by putting a few dots all over the face and using a brush to blend the foundation out.” If you don’t want to use a brush, you can also use a sponge or beauty blender.
Step 4: Conceal Where You Need
Conceal Where You Need Save
Concealer is amazing to make you look more awake and get rid of shadow, dark areas. Pick a product that is two shades lighter than your foundation or natural skin tone. Dab the concealer on your skin with your fingers or a beauty blender to make it look natural.
Lindsay comments, “Concealer is generally used to spot treats and cover areas you would like to be covered. Some of the most common areas of concealer are placed under the eyes (to cover dark circles or redness), around the nostrils (to cover redness), and on the forehead. It can also be used to cover any spots or pimples that you might have. Concealer is usually just a higher pigmentation than foundation, meaning it is more opaque in coverage – something you generally don’t use all over the face.”
Step 5: Brush Some Setting Powder
Brush Some Setting Powder Save
Set your makeup base with loose, compact, or setting powder. But remember, when it comes to powder, less is more. Use just the right amount of powder to set your makeup. Apply in areas where you tend to get shine and oil, and your makeup might break down.
Lindsay Kastuk, states, “I always use a light dusting of finishing powder as I like the skin to remain radiant and glossy. I apply finishing powder with a small fluffy brush in areas that tend to crease or get oily. Areas that tend to crease are under the eyes, around the mouth and the forehead. Everyone gets oily in different places, but you want to concentrate finishing powder in those areas as well.”
Step 6: Contour With Bronzer
Contour With BronzerSave
Bronzer is an instant pick-me-up that imparts a beautiful glow. Lindsay stresses on using the bronzer in a proper way. Let’s see what she has in store about this step: “I apply bronzer to my clients to give a sun-kissed glow. I apply bronzer with a larger fluffy brush to the high points of the face – where the sun would naturally hit you. The forehead, the tops of the cheekbones, and the nose.”
Step 7: 'Blush' It Up
‘Blush’ It Up Save
Blush brings color to your face and is a game changer. Swipe some blush to the apples of your cheeks and blend back to the top of your ears. You can go for rose, pink, peach, fuschia hues, depending on your skin tone.
According to Lindsay, “Blush is a big trend for spring. Blush can be applied anywhere you’d like but definitely use a medium-sized fluffy brush for this one. You want to make sure you have a light hand. You can always build up the color; it is harder to take it away.”
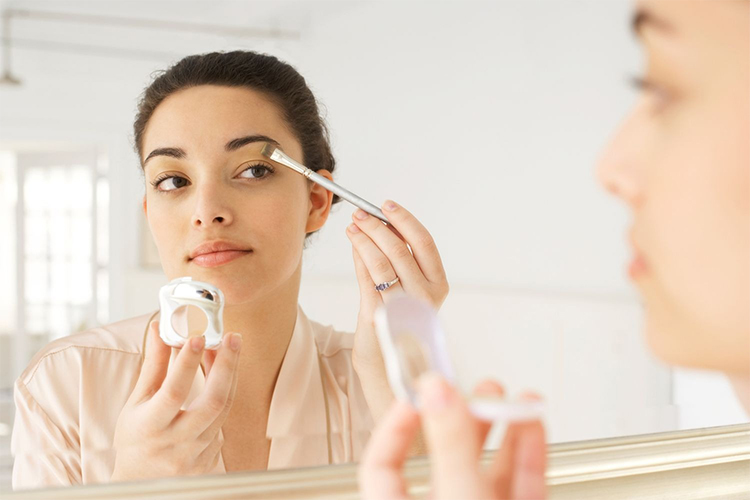
Step 8: Do Your Eyebrows
Do Your Eyebrows Save
You can use brow liner or eyebrow pencil or gel to shade or fill in your eyebrows. Unless you have blonde hair, use a product two or three shades lighter than your hair color. Follow the natural curve of your brows and create a well-defined arch with an eyebrow brush (spoolie on one end and angled-tapered side on the other).
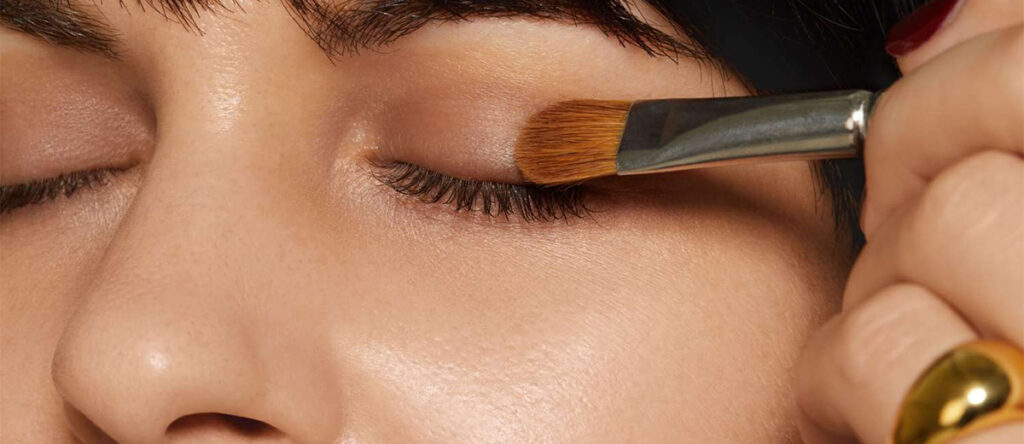
Step 9: Define Your Eyes With Eyeliner
Define Your Eyes With EyelinerSave
Apply eyeliner before mascara and after applying eyeshadow or doing your eyebrows. Use waterproof eyeliner and use it in your waterline for added definition. You can choose a gel, liquid, or pencil eyeliner.
“This depends on what kind of eyeliner you like! I love using a gel liner and a brush, I feel like I have more control this way, and my lines are much more crisp. If you are looking for a classic line (no flick or wing), start as close to the base of your lashes as you can and just follow your lash line. You can build the thickness of the line from there!”
Step 10: Use mascara
Use Mascara Save
Make your lashes fuller, thicker, and longer with mascara. Try to use a lightweight or air-whipped formula so that your lashes do not feel weighed down. Also, do not skip on eyelash curler before applying mascara if you want to hold your curl. Lindsay suggests, “Always start at the base of the lashes! You want to get as close to the base of the lash and pull the rest of the product through to the tip of the lash. Ensuring you get the base of the lashes creates volume at the lash line and makes the lashes look fuller.”
Step 11: Add highlighters
Add Highlighter Save
Highlighter will provide a final touch to your face makeup steps. Blend your highlighter on the ‘high’ points of your face where the sun would hit naturally. If you are a beginner, go for a powder highlighter.
Lindsay Kastuk claims, “Highlight can be applied with a smaller fluffy brush or with your finger too because it is a smaller area. The tip of the nose, the cheekbones, and a bit on the cupid’s bow are my favorite places to highlight. The product catches the light and highlights those areas of the face.”
Step 12: Tint Your Lips
Tint Your Lips Save
Outline your lips with a lip liner and select a lipstick of your choice. Match the color of your liner with your lipstick shade. If you want to create fuller lips and a larger pout, make the line over your lips (outside your natural lip line). You can also follow what Lindsay Kastuk has been doing for years – “Lipgloss is an easy “throw on” for any makeup look! A quick swipe over bare lips or over any lipstick you might have.” Lip gloss applied as makeup makes your lips look plumper.
In conclusion, applying makeup like a pro involves several key steps. It starts with prepping the skin by cleansing, moisturizing, and applying a primer. Then, a liquid foundation is applied followed by concealer, setting powder, bronzer, blush, and eyebrow definition. Eyeliner, mascara, highlighter, and lip color complete the look. The key is to use the right tools and techniques for each step, and to blend and layer products for a seamless finish. Practice and experimentation are important to find what works best for your individual features and preferences. With time and patience, anyone can master the art of makeup application and achieve a flawless look.